ShopDreamUp AI ArtDreamUp
Deviation Actions


Description
Hello I have a tutorial for you~
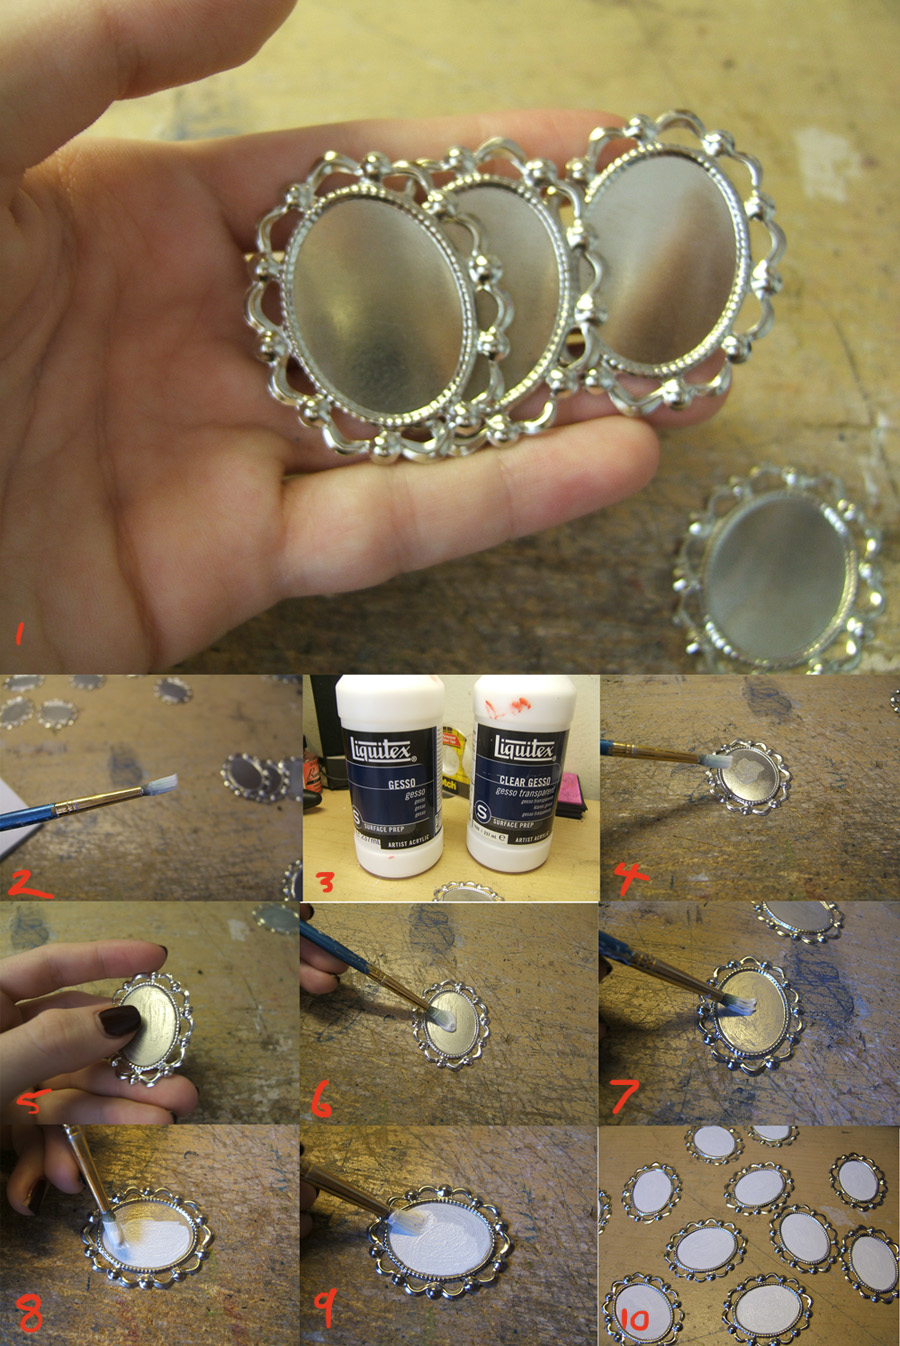
It’s on how I prep metal jewelry findings for paint, since I get that question an awful lot. From experience, this will work with any type of paint, but I personally use gouache.
Okay let’s go:
Things you will need (Photos 1-3): Findings of choice (duh), a small round brush (actually, any brush will do, as long at it’s small and you’re willing to let it get fucked up), clear gesso, and white gesso. Yes, two types of gesso. Trust me.
1. Take some of your clear gesso and start coating the space you want your paint to adhere to (Photo 4). The trick with this method is to not put on a thick layer of gesso. That is the path to deep grooves and bumpy surfaces that are hard to draw on. So don’t do that.
2. Wait until it is dry to the touch (Photo 5), which should take only a few minutes.
3. Then put on another layer of clear gesso (Photo 6). Why two layers? Simple: I want to get rid of all the metallic glare and lighten it up a bit. Plus, I’ve found that two coats make a more even surface for the white gesso.
An aside: Do not start with the white gesso. Trust me on this. What will happen is you will get dark streaks, deep grooves, and a nasty surface to work on. The clear gesso helps to create a much nicer surface with a little bit of tooth.
4. Let the gesso dry for 30 minutes to an hour. Now, take your white gesso and paint it on! (Photo 7)
5. Take your time here (Photo 8) and follow the edges very carefully. Small mistakes are okay, but people will notice if the white gesso is completely sloppy. Don’t rush it.
6. Wait a few minutes, then paint on another layer of white gesso (Photo 9). You can stop at one layer of white, but a second layer will bring it to an opaque white, instead of a slightly transparent off-white. This will also make your colors much more vibrant.
7. You’re done! Let them dry for a good 3-6 hours before you start drawing and painting. No idea if I’m going to do a tutorial on that, but I’ll try.
Also, if you want to see the the pieces I'm working on, go here: [link] Hell, just follow my Tumblr.
Image size
900x1346px 420.6 KB
Make
FUJIFILM
Model
FinePix E550
Shutter Speed
1/28 second
Aperture
F/2.8
Focal Length
7 mm
ISO Speed
200
Date Taken
Jan 1, 2004, 12:00:41 AM
Sensor Size
1mm
© 2011 - 2024 SapphireKat
Comments4
Join the community to add your comment. Already a deviant? Log In
Where did you get these?